Zeppelin Rides with Airship Ventures

Zeppelin - Orcatek Photography

I spent most of last week in San Francisco to ride Airship Ventures zeppelin to get some shots of the city and the Golden Gate bridge.   This was my second trip out California to try to get a ride on the zeppelin.  Once again our flight was cancelled due to weather (our 3rd failure), but we decided to stay another day or so and try again.  Weather was with us and we did get to finally fly.  Discussions with others reveal that cancellations due to weather are quite common (passenger on our flight had 6 cancellations), so don’t be surprised if you plan a trip and don’t get to go. 

We booked the two hour flight, base on  the website showing the flight going up the valley, across to the coast, over the bridge and back south via the bay.  Our flight was at sunset so being on the west side of the Golden Gate bridge was going to be perfect.   Warm sunset light on the bridge would make for some amazing photographs.

The zeppelin has 2 windows which open to allow glare free shots for photographers, one on each side.   I was really looking forward to getting some great shots of the bridge and coastal cliffs.  At an altitude of about 1000 feet you have a great opportunity for photography.  

San Francisco via Zeppelin - Orcatek Photography

We flew north towards the city along the 101.  This time of year the sun was setting a bit earlier than I would have liked ideally.  I wanted to hit the city about 10-15 minutes earlier.  We did not go out over the coast as the website indicated, but since the captain can vary the route as needed I wasn’t too surprised.  I assumed we would use the bay to cross the bridge.

As we came up to the bridge I asked about flying over it and was told they were not allowed to fly over.  I asked about going around to the front and was told they cannot do that either due to park regulations.   So I was not going to get the photographs I wanted as shown on their website.  I wonder what changed and why they don’t advertise the new routes.  Needless to say I was not happy.

Golden Gate at Sunset, Orcatek Photography

If I had known this was the case, the 1 hour flight would have gotten the same results for much less money.  The southern portion of the flight is not the most picturesque, but I was willing to use this time to get used to the environment.  

The zeppelin makes a great photographic platform,  you just need to be very aware of where it flies.
Orcatek Photography – Phoenix, Arizona


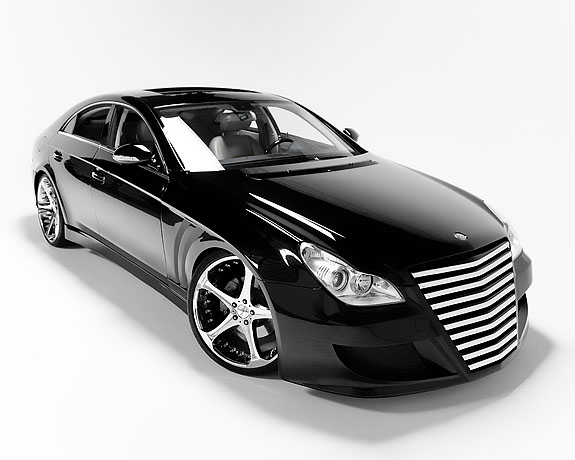
Custom Mercedes in Black

This week I faced the fun challenge of photographing a black custom Mercedes in my studio.  As with all black cars, dealing with the many reflections was key to success. 

 Mercedes-Automobile-Photography-Phoenix

It is always worth the effort as I really enjoy photographing cars.  From classic hotrods to amazing exotic cars, each presents their own set of challenges for the photographer.  Finding the perfect angles to show off the curves of a fender, or just the right type  light to bring out details hidden in shadows are just a few of the problems I enjoy solving.

I’ve got another great car coming into the studio soon that will provide the opportunity to use some new techniques.

Orcatek Automotive and Motorcycle Photography – Phoenix, Arizona


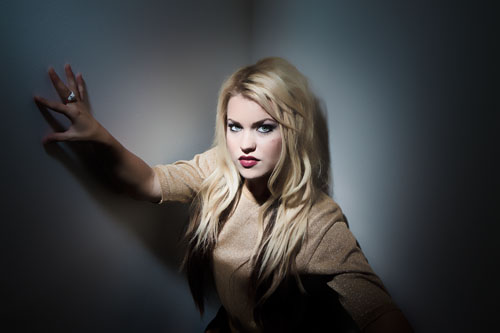
Model Portfolios

So you want a modeling portfolio.   A model’s portfolio is her resume.  It shows what she has done or is capable of doing.  Before going out and getting a portfolio done, contact the agency you want to work with and see what they prefer to see.  Some don’t want anything more than basic photos showing what you look like. 

A portfolio should include at least a casual head shot, a fully styled head shot (hair and make-up professional done), body shot (swimsuit is ideal, or lingerie), a fashion shot, action/lifestyle shot and even an editorial or catalogue shot.   Key is not to put styles you don’t want to work from in your portfolio, ie don’t have several lingerie shots if you don’t want that type of work.  Include at least one B&W shot.Fashioin-Photography-Phoenix-9-14

Over time you replace old photos with new ones.  Best of all is to add tear sheets from work you have done.  Tear sheets get their name from pages being torn out of magazines showing a model’s work.

Your best two pictures show be the first and last.  If the first shot doesn’t catch their eye, they may not go much further thru your book.  And you want the last shot to be remembered so you close on a high.  Very often the first shot is the made-up headshot.

It is better to have fewer great pictures than a lot of average pictures.   Standard book prints are 9×12 and contain a max of 20 photographs.   It is better to have only 10 great photographs, as quality is key.   Yes, I’m repeating myself, but it is an important point.

You need a mix of environments.  This means some location work and some studio work.  Don’t use two shots of the same outfit.  Pick the best one.

You need two good headshots.  One should be the made-up shot mentioned before and the other with minimal make-up and retouching.  Ideally your hair will be back on the second shot as they really want to get a good look at your face as you are naturally.

Beware of agencies that want you to pay them or their photographer to get your portfolio made.  If they won’t let you use your own photographer, run, run away fast.  It is fine for them to have suggested photographers.

Modeling can be a fun and rewarding career.   Photographs are a major expense that you will be paying.  Be sure to get what you need, when you need it.

Orcatek Photography – Phoenix, Arizona


How to succeed as a photographer – Part IV

This is the final part of my series on how to be a success as a photographer. In past blog articles I wrote about working with your clients, providing them with what they want and equipment choices. This week I am going to write about some more tools and training. I am going to assume you are working with a digital camera like me.

The worst thing any photographer can ever say is “No problem, I will fix it in Photoshop.” I can only wish every time a photographer says this they get a shocked by their camera – ZAP! Yes Photoshop is a great tool for photographers, but it should be used to enhance a good photograph. Removal of stray hairs or getting rid of blemishes are good uses for it. Even using the adobe color picker to airbrush out some background details is fine, but going overboard will make the photo look unrealistic. You need to get the shot right in the camera first or it’s like putting pants on a pig, it’s still a pig.

You may have noticed I said Photoshop. There are several other good programs available that you can also use such as Gimp or Paintshop. The challenge with these programs is when the time comes to share your work or even get training your options will be limited. In the end you will need a good program to retouch your images. Or you can hire a service to do this for you. This can be a good choice as you spend your time taking photos and not sitting in front of the computer.

The next question I get is, “What plug-ins should i buy?” Plug-ins are those add-ons to Photoshop that automate and add features. None are actually needed to do standard retouching. You can achieve what you need to do without them. Some are nice to have as you have revenues, as they can save time. If you must spend some money, I suggest looking at a sharpening tool and a skin softener. Learn to use them with a lite touch. You will hear the term selective / masking in Photoshop. You can download trials from almost every major vendor. It is a matter of tasted as to which works best for you.

Learn to create or find some actions to do your work. Actions are an automated series of steps in Photoshop that are processed very quickly. I have about four actions that I use daily which I have created. These are about fifteen to twenty steps long. What would take me over ten minutes to do manually, the action will do in about a minute. For example, I use an action to take a two page album spread and cut it into two images, adjusting the image for the gutter (area where pages come together in the center of the book) so the spread looks good when the book is opened.

If you can’t write your own actions, look on-line for them using one of your favorite search engines. One good action site is atncentral.com – Lots of free actions. Even if you don’t use them, you can see how they were constructed and learn some things about Photoshop can be used. Assign the ones you like use to function keys to save time when you want to run them. You can even use these in batch processes to do a hundred images at once – great for weddings.

Get some training on using Photoshop. Attend classes, get a book, read magazine articles, or even on-line. Lots of good free Photoshop videos are available on YouTube. Photoshop is very powerful and some basic training will go a long way towards learning how to use it. There are plenty of training facilities like Acuity Training, which offer hands-on practice for Photoshop and help in flexing your creative muscles.

Also, the one tool you should get is a graphic tablet, such as those made by Wacom. They make a small tablet that does everything a photographer needs – the Bamboo is about $80. It will save you huge amounts of time and improve accuracy once get used to using it. Later you may wish to upgrade to a larger one, but I have both and have found the small one is just as good or possibly better for my photo retouching work.

The other big time saver I cannot stress enough is learning the keyboard shortcuts in Photoshop. This will save you so much time you can’t imagine. It doesn’t take long to learn either. Here’s how you can learn them quickly. Each time you need to click on a tool or menu item, look at the short cut and then use it instead of clicking. The items which you use a lot you will learn in a very short period of time.

Once again I’ve gotten long a bit winded in this blog article. Feel free to drop me a line with any questions you might have. For those who are in the Phoenix area I do teach retouching with Photoshop.

Orcatek Photography, Phoenix – Arizona

Photography Studio Rental in Phoenix


How to succeed as a photographer – Part III

This is part three on succeeding as a professional photographer. The question that I am always getting asked is what equipment and tools should I buy. “Canon, Nikon or Sony is coming out with a new whiz-bang gizmo, should I buy it?” In short, probably not. I am not going to recommend brands, because as long as you stick to the major manufacturers it doesn’t make a whole lot of difference in the long run.

First lets look at cameras. The body you choose depends a lot on what you will actually be shooting. If you are shooting action sports a camera with decent frame rate should be considered. Also read up on focus speed and focus tracking. Portraits are your primary business, then low light might be important, so look at noise levels for these images. In the end a lot of photographers choose a camera which does well in both areas, but isn’t the best at any. Another option is two cameras, one suited for each style.

Eventually you are going to need to have two cameras. As a professional you need to have a back-up available for emergency. In the beginning it may make sense to rent your back-up camera until revenues justify owning a second. Also remember your back-up does not need to be the same model as your primary. A lower end camera can work fine. Typically I rotate cameras from primary to back-up to sold. Last year’s model is often a great way to save.

Which brand of camera should you be using? If you know other photographers, using the same brand may be beneficial. You may have the ability to borrow a lens for flash in an emergency if you use the same gear. Also you will have someone to ask questions.

Lenses are another area of debate among photographers. A prime vs. a zoom is the one of the biggest questions. Primes will almost always give better results than zooms. But in the real world, it can be very difficult to tell the difference in a final print if you have good zooms. The most important thing is to buy good lenses. You will have them for a long time, whereas camera bodies in the digital world have become consumables unfortunately. Again, rent the specialty lenses as you need them. Owning a seldom used lens is a waste of precious money.

Lighting is the last key piece of equipment. Reflectors and bounce cards are your friend. Learn to use them and you will need fewer lights, saving money. If you are shooting outside the studio you need a good on camera flash. Lots of modifiers are available read reviews and get one you like, or make one. The ability to use your flash off of the camera will come in handy, so consider this as a future upgrade – brackets with cords or wireless remotes for longer distances.

In studio you can do a lot with as few as two lights, especially with the use of reflectors and a few good modifiers. Umbrellas are the lowest cost modifier, but softboxes tend to be the favorites among the pros. Get some decent stands and some sandbags to keep the lights from falling over. Once again look at wireless remotes, you can use cords to save some dollars, just be careful about tripping. Some lights have them built-in. This equipment can be rented too as needed when you are starting out.

Renting a whole studio for your shoots is a good idea when starting. A studio is a huge overhead with rent, utilities, alarms, insurance… Many studios rent to other photographers, and some cities have studios that only exist for rental purposes. Some rent equipment too making it every easier, albeit a bit more expensive.

Insurance is probably one of the most important areas that photographers will overlook. You need to not only insure all your equipment but also have general liability insurance protection. This can help you when you need financial assistance if any damage claims are alleged against you while working from your home studio. You may be able to add it to your home owner’s policy when you start out. Check as if you use your equipment for business, it is often excluded or requires a special rider.

The biggest equipment area to watch is spending. Don’t buy until you can justify with revenue. It is so easy to want the latest and greatest. Manufactures love to push this, but buy with caution. If you don’t manage your money, there will be no money to manage.

Next week I will continue this discussion and talk about computers, software and organizations.

Orcatek Photography – Phoenix

Studio Rental in Phoenix


How to succeed as a Photographer – part II

Last week’s article I wrote about providing the clients what they want.  Today I am going to spend some time in this article going over another key area – working with your clients during the shoot.  If you are shy and want to hide behind your camera when around clients, then shooting people is most likely not where you should be.  But you may very well succeed photographing products, nature or architecture as area for you to specialize.

Unless you are photographing professional models, most people (and some models) need direction to create a photograph that they will love.  You will often hear your client say “I’m not very photogenic” or  “I hate having my photo taken.”   Learning what causes these thoughts will help you create the photographs desired.

I will go for the direct approach by simply asking “Why do you hate having your photo taken?” or “What makes you feel that you are not photogenic?”  So very often their answers will be easily addressed during the photography session.   Sometimes it just creative posing/ligthing and other times it is going for the less staged portrait.   The key is to understand their concern and find a way to show them you are confident that you will solve this.

To get natural smiles I have a running dialog during the shoot, telling some really bad jokes and just generally being a bit silly.  Sometimes I talk about movies or television.  You need to find an interest of theirs and talk about it.  This will take them away from thinking about their photo taken and get them relaxed enough to create some great photographs.

You have probably seen the commercial where the dad says “I know all the songs from High School Musical.”  The daughter is very embarrassed by the singing and dancing dad.  Be that singing and dancing dad.  By being aware of the world of your subject you can relax them.   Shoot younger kids know Sponge Bob and his friend Patrick.   You get the idea.

Consider shooting with background music.  Having clients bring in their mp3 player of their favorite songs to patch into the sound system.  If they don’t bring one, ask which station they want on the radio.  Music usually elevates the mood and adds a comfort level. 

And of course, getting feedback as soon as possible helps both you and the client.   Some photographers hate showing the clients the LCD.  I find that limited use can be a huge benefit.  Nothing works more to put a client at ease then showing them a great shot on the LCD.  And on the rate occassion they don’t like what they see, you can address it before you take all the shots that way

A running commentary on what you are shooting helps too.   I am always saying ““Beautiful!” or “Wow!” or “Amazing!” or “This is a great shot” etc.  Your positive chatter boosts your client.  And the best part is, you should being telling the truth.  These are great shots of the client.  Just be sure to choose your words carefully.  Using words like sexy and hot can make a client very uncomfortable very quickly.

What it really comes down to is making the client feel comfortable and relaxed.  Remove the stress and make the photography session a very fun experience.  By quickly developing a relationship with the client, you will know how to bring out their very best.  I’ve had the opportunity to spend time with a lot of very successful photographers and these thoughts are common across the group.

Orcatek Photography – Phoenix


How to succeed as a Photographer

How can I be a successful as a photographer is a question that I am frequently asked. Typically aspiring photographers want to know what brand of camera they need, or what cool Photoshop tools to use to make their photos look amazing. The answer which I give very often surprises them.

Obviously the first thing you to learn is how to take a good photograph. The take read some art books or bettr yet take an art class and learn about composition and color. Notice how I say art class and not photography as the rules in art apply to photography. A camera is just a tool for acting upon these ideas.

Then get a basic understanding of how to control light. Control of light is what give photographs “the look” the photographers always seem to want to do in photoshop. Proper light is where it all starts.

Finally learn how to use your camera in manual mode, apeture mode (Av) and shutter mode (Tv). Now you can take photographs, but this will not make you successful, merely qualified to be a photographer.

If you want to be a successful photographer you must learn how to work with your clients. You must be able to read what their needs and desires for a photography session actually are. If you simply meet their needs (a photograph), they won’t leave happy. You want your customers to be happy, as they come back and they also send you referrals.

Being successful is not about being to sell your client huge portraits to hang on their wall. Sure you make a profit, but you don’t build confidence. Sell a client what they really want, not necessarily what they initially ask for, and they will be very happy and they will be back. How many times do you hear “I want Austin family portraits to hanging in the family rooms.”

For example when a client comes for a portrait session I will ask what they plan to do with the photograph. Are they going to want to have prints for their family and friends? Where in the home will they be displaying their portrait, how large is the space. This allows me to suggest the proper size for the space, typically this will be larger than they thought, but on occasion smaller. Clients sometimes don’t consider that matting and framing can often make the final product much larger than they thought.

For the prints for friends and family I discuss with them the option of acquiring digital files to print themselves, or if they prefer the convenence, I can do the prints and quality control. Most clients will want to get the “important” prints done by my studio and use the digital files for email and secondary prints they will create as needed.

Providing the client with what they want is only a very small part of becoming a successful photographer. Next week I will continue with part II on this topic.

Orcatek Photography – Phoenix


Motorcycles and Automobiles in the Studio

Automotive or motorcycle photography in the studio presents some interesting challenges. This week I will take a look at some of the options for dealing with these details.

Motorcycle Photography Phoenix Orcatek

First of all they are big and don’t move easily to “adjust their pose”. Motorcycles are a bit easier to photograph as they can move easier, but cars or trucks are just a lot of work. Careful planning is required.

The first thing you need is a studio with enough space to hold the car and allow the photographer to get far enough away to shoot it. If you are too close you will need to use your wide angle lens leading to shots where the vehicle will have a huge front end for example. Sometimes this look can be desired, but more often than not, it is problematic. I prefer to be a good 20 or more feet to keep proportions correct.

For moving the car around, car wheel dollies are great. One goes under each tire and you can jack it up then basically push the car in any direction you want, even spin it in a circle. They are not a cheap tool, but if you shoot a lot of cars, they are well worth the investment.

The other most difficult thing to deal with is reflections. The whole automobile is one great big mirror. Chrome on motorcycles can be even worse. And of course the classic black hot rod looks great, but shows everything. A very clean studio area is critical. Anything that must remain should be pushed as far away as possible from the car. This includes yourself and your assistants.

I actually have my assistants step off set behind a wall in my studio. I wear black to help hide my reflection. Another reason for keeping the photographer to automobile distance large during the shoot, is that it makes the reflections much smaller and easier to deal with in post.

Lighting is another key. You need a large soft light from above for most automotive work. Since I shoot on white, I have painted my light stands and cords white to hide them in reflections. Nothing more annoying than a beautiful white highlight on a car with a light stand jumping out at you.

Feel free to contact me with any questions. And if you are in the Phoenix area, I do rent my studio to other photographers.

Orcatek Automotive and Motorcycle Photography


Couples fine art nudes enter the boudoir

When a couple comes to my studio for their boudoir photo session, they often don’t really know exactly what type of photographs they want, other than they would like to pose together as a nude couple.  So one of the first things I like to show them, as a photographer, is some of my couple’s fine art nude work.

I find often the fine art nude style is something they had not even considered, but are very interested in doing some once they have seen the samples.  They will describe these types of photographs as “classy and tasteful”, something they would actually display in their home for others to see without feeling embarassed.

The are of creating complimenting shapes with couples does present some extra challenges.  You now have two bodies that the photographer needs to protect modesty.   Additionally they both may have some physical attributes which they would prefer to be managed or concealed.  With careful posing and lighting, the photographer can create photographs which anybody would be proud to display in their home.

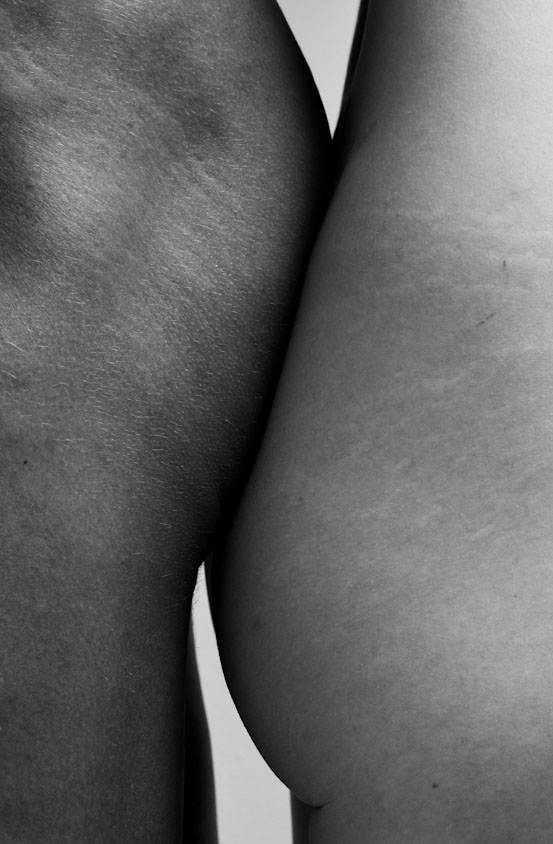
One of the methods photographers like is to intertwine the bodies of the man and women, wrapping arms and legs into a twisted puzzle.  When I use this technique, I like to shoot tight, often making in a challenge to identify the body part owner’s in the photograph. 

BunsAnother great technique it to compare or contrast the same body part.  Chests, backs and rears are all great choices for this style of photograph.  He likes her rear, she like his, and a great photograph is just waiting to happen.
Even though fine art nudes are not typically thought of as boudoir by most, adding them to the styles available to boudoir photography clients provides another an opportunity for couples to create photographs that are tasteful and beautiful. 

Orcatek Boudoir and Glamour Photography – Phoenix, Arizona


Photography Challenge, Motorcycle on the Beach

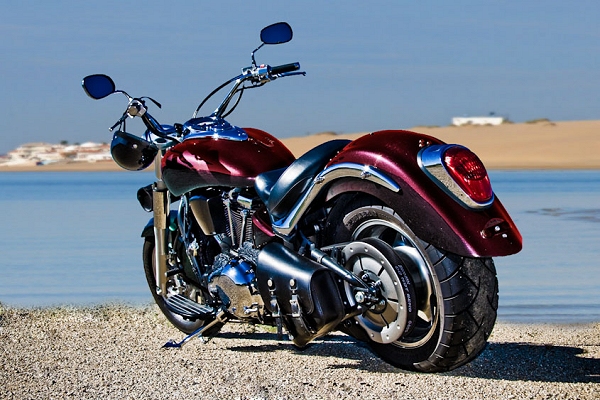
This week presented a challenge, off to the beach for to photograph a motorcycle. Shooting a motorcycle or car at a beach is typically very difficult. The biggest challenge is the motorcycle will sink into the soft sand of the beach. On a soft sandy beach I would need bury a layer or two of plywood just below the surface of the beach and then smooth it out after placing the bike.

Next challenge is timing as the tide will be moving either in or out, and depending on the location this can be a foot or two, to hundreds of feet if the slope of the beach is very gradual. One of my favorite beaches the low and high tide lines are tyically 200-300 feet apart. The smallest tide swings on at the half moon phases.

And of course waves will also present a challenge as they roll in and out. Salt water is very bad for vehicles, so keeping them dry is a priority. I would recommend wearing a helmet before you try this out so make sure you read motorcycle helmet reviews online.

Of course, no one likes to think too much about getting involved in an accident while on their motorbike, but mistakes can happen and therefore it is crucial that you take steps to ride safely. A friend of mine recently went on a motorcycle trip to Las Vegas and he told me that in las vegas motorcycle accidents are unfortunately very common. He also said that these incidents sometimes lead to lawsuits and personal injury cases. Consequently, please do as much as possible to avoid getting into difficulty when on your bike. Especially during a photoshoot.

In this case the beach had a hard area that was not sandy at all in this area. Being hard and dry the bike could stand on its own. The area was sheltered enough and the sea was very calm, usually mornings are the best time to find this calmness.

Motorcycle Photography

In the end, everything came together. When things were set-up, I liked where the sun was, creating a good shadow, the tide was moving in slowly to position and the sea was calm. With the addition of some supplemental lighting to fill in and create some sparkle, it came together as I had imagined.

Orcatek Automotive and Motorcycle Photography – Phoenix


TESLA DEALS

Use my referral link to buy a Tesla and get up discounts and free extras. Click now to save

TESLA DEALS

Use my referral link to buy a Tesla and get up discounts and free extras. Click now to save